How to Prevent Carpal Tunnel Syndrome

As more of us work from home, we are at a higher risk of developing overuse injuries including carpal tunnel syndrome. This is a common condition that is associated with pain, numbness, and tingling in the wrist and hand. This occurs when the median nerve, one of the major nerves that travels through the forearm and hand, becomes compressed as it travels through the carpal tunnel in the wrist. Common causes of this compression and irritation to the nerve include repetitive hand and finger use when typing and writing as well as poor wrist and hand positioning while performing these activities. Here are some suggestions to help prevent and treat this condition:

  1. Take breaks – If you find yourself doing a lot of typing throughout the day, make sure that you are taking a 10 minute break from typing every hour at the minimum.
  2. Keep your wrists neutral – Avoid excessive bending of the wrists in either direction to avoid increased compression on the nerve. As you type, try to keep your wrists in a neutral or slightly extended position
  3. Focus on posture – The positioning of the rest of your body, including your head, neck, and shoulders can contribute to symptoms all the way into the hands. As you sit at your desk, make sure that you maintain good posture by keeping your head upright, shoulders back, and avoiding a slouched posture.
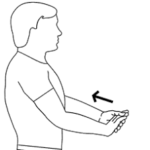
  4. Stretch – Tightness in the muscles of the wrist and forearm can contribute to your symptoms. As you are taking a break every hour, stretch the muscles by pulling your hand and fingers back towards you and holding for 30 seconds at a time, as seen in the picture below.

 

Assistive Devices: One size does NOT fit all

Walkers, crutches and canes – oh my! Assistive devices are great tools to help those who need them increase both functional ability and safety. When someone is in need of a particular assistive device it is important to not only choose the right device for their needs, but to also make sure that it is adjusted appropriately in order to provide them with optimal function and safety. Often, people are either given or go out and buy an assistive device without any guidance on how to size it correctly. Using a device that isn’t appropriately fitted can cause safety hazards but also can put strain on other parts of your body. Below you will find general guidelines to adjusting common assistive devices.

Walkers 
– Use the buttons on the legs of the walker to make them shorter and longer.
– Make sure each leg leg of the walker is set to the same level.
– The handgrip of the walker should be at the level of the crease of your wrist with your arms down at your sides.
– If the walker is too high it will cause increased bending of the elbows and cause increased strain on the shoulders.
– If the walker is too low it will cause the person using it to slump forward, causing strain to the back.

Canes
– Similar to walkers, the height of a cane should be set to where the handle of the cane is at the level of the crease of your   wrist with your arms down at your sides.
– The potential consequences of setting a cane too high or too low are the same as with walkers with the addition of possible leaning of the trunk which can cause a higher risk for falls.

Crutches
– When sizing crutches, the bottom tips should be a few inches in front and to the side of your feet.
– Similar to walkers and canes, the hand grips the crutches should be level with the crease of the wrist with your arms down at your sides.
– The top of your crutches should be about 2 inches below your armpit.
– If crutches are adjusted too high, it can cause the top of the crutch to put increased pressure on the armpit which can lead to possible nerve damage.
– If adjusted too low, it can cause the individual to slouch over which can put strain on the back but also have an impact on the person’s balance.

These are only the guidelines for a few of the most common assistive devices seen in the community. There are many other types of devices that each have their own sizing standards for optimal use. If you or someone you know needs assistance in sizing a device, please consult a physical therapist to assist you to ensure a proper fit.

Written by: Dr. Taylor Ryan

How does Movement Help Injuries Heal? I’ve got a bone to pick.

If you’ve ever been to a physical therapist, you know that exercise is usually prescribed as the primary treatment for a number of injuries and conditions. Clearly exercise has numerous benefits, but it can sometimes seem counterintuitive to place resistance or load through an injured area — doesn’t it need time to rest and heal? The short answer to that question is generally yes, especially immediately following the injury; however, the appropriate amount of movement and exercise can actually promote healing and recovery.

My goal is to help you understand just how exercise helps restore normal functioning of injured body tissues. This article is part of a series that will discuss how various types of tissue depend on movement to recover. Today’s subject is bone.

In the case of fracture, bone is the exception to the rule of “get it moving ASAP.” Allowing a bone to fully heal is vital to maintaining its structural integrity throughout the rest of your life. However, once it is healed and in cases where the bone has begun to weaken such as osteoporosis or osteopenia, weight-bearing exercise is vital to maximizing its strength and reducing the risk of re-injury.

Exercise helps strengthen bone by increasing its density. Density is typically measured by something called a DEXA scan, which is used to diagnose osteoporosis/osteopenia. Over time, the density as measured by these scans is maintained or increased in response to exercise. However, these increases are site-specific, meaning that exercises involving your lower body will only increase the density of the bones in your lower body (and vice versa with your upper body). Of particular note is that in postmenopausal women — the demographic most affected by osteoporosis — exercise is shown to mitigate losses in bone mineral density. So, after speaking to your physician or physical therapist about which exercises are best for your condition, it’s time to get moving!

Now let’s get specific about the best types of exercise. Exercise that is in an upright position against gravity is considered most effective for improving bone health. Such exercises include walking, jumping, and resistance training with weights or bands. Bone thickens in response to these types of exercise because gravity and the physical pull of the muscle tendons on our bones elicits an adaptive response. Exercises such as swimming, while still very healthy for us, aren’t quite as effective for improving bone density.

Written by: Dr. Scott Newberry